Linux 无法启动的修复方法
Table of Contents
1. BIOS + MBR 硬盘
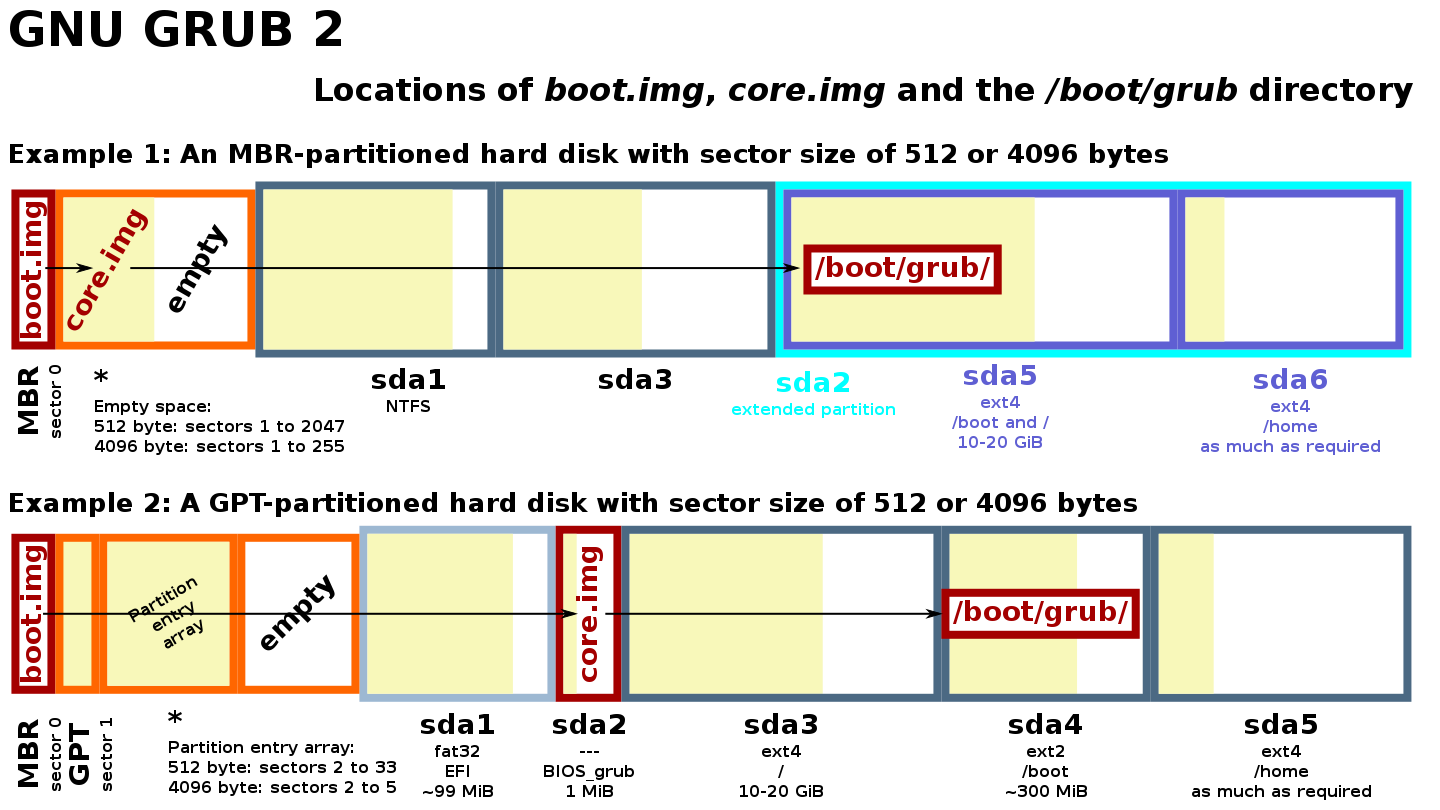
这个组合对应图中的 Example 1。
MBR (Master Boot Record) 又叫主引导扇区,是计算机开机后访问硬盘时必须读取的第一个扇区 (sector)。对于硬盘而言,一个扇区可能的字节数为 128×2^n (n=0,1,2,3)。多数情况下,取 n=2,即一个扇区的大小为 512 字节。
在讨论 MBR 的内部结构时,有时也将这个扇区的前 446 字节内容特指为 MBR,在 446 字节的 MBR 之后的是大小为 4 个 16 字节的硬盘分区表 (DPT)。最后是 2 字节 (内容为 55AA ) 的结束标志,这两个字节也是检验主引导记录是否有效的标志。
故后文提及 MBR 时需要根据语境判断它到底指的是一整个扇区,还是这个扇区的前 446 个字节。
要模拟启动故障,可以通过清除 MBR 前 446 个字节来模拟启动记录损坏,通过清除前 510 个字节来模拟启动记录和磁盘分区都损坏。
1.1. MBR 损坏
dd </dev/zero >/dev/<bootable-disk> bs=1 count=446
重启后,发现启动失败。此时 MBR 数据丢失。
找一个 Linux LiveCD 开始修复。进入 LiveCD 环境后,执行 fdisk -l /dev/<bootable-disk> 会发现硬盘上的分区表还在。
先把硬盘上的根文件系统挂载到 LiveCD 的 /mnt 目录下:
# for ext series file system
mount /dev/<disk-partition> /mnt

# for btrfs file system
mount /dev/<disk-partition> /mnt -o subvolid=<root-subvol-id>
挂载必要的文件系统到 /mnt 中:
mount --rbind /dev  /mnt/dev
mount --rbind /proc /mnt/proc
mount --rbind /sys  /mnt/sys
chroot 到旧的 root 分区下:
chroot /mnt bash
重新生成 bootloader (这个过程中会重新写入 MBR 数据):
grub-install /dev/sda
重启恢复正常。
1.2. MBR 和分区表损坏
dd </dev/zero >/dev/<bootable-disk> bs=1 count=446
重启后,发现启动失败。此时 MBR 数据和分区表数据一起丢了。
进入 LiveCD 后,执行 fdisk -l /dev/<bootable-disk> 会发现硬盘上的分区表没了。
此时需要使用 testdisk 工具重建分区表,具体操作查看文档。重建分区表之后,重复上节操作,即可正常启动系统。
1.3. GRUB 损坏
机器执行 MBR 代码之后,接着会用文件系统上的 grub 来加载操作系统内核和 initramfs。
mv /boot/grub /boot/grub.bakup
此时,grub 配置丢失,重启失败。
修复过程和第一节类似:
- 进入 LiveCD
- 挂载旧的根文件系统到 /mnt
- 挂载必要的文件系统到 /mnt 中
- chroot 到 /mnt 中
- 重新生成 bootloader (此过程也会重建 /boot/grub 目录)
最后,根据需要修改 /etc/default/grub 中的配置,然后执行 grub-mkconfig -o /boot/grub/grub.cfg 重新生成 grub 配置文件即完成修复。
2. UEFI + GPT 硬盘
硬件自检完成后,BIOS 会从找到的第一个 EFI 分区中加载并执行 bootloader 程序 (<EFI-partition>/EFI/gentoo/grubx64.efi)。执行完 bootloader 之后,GRUB 就能找到 /boot 目录 (包含 GRUB 的附加模块、内核和 initramfs 映像) 所在的分区,并用自带的文件系统驱动读取 /boot 目录。最后 GRUB 会将内核和 initramfs 映像装载到内存中,并将控制权交接到内核。
2.1. ESP 损坏
由于 ESP 本身是一个分区,并且这个分区所用的文件系统比较脆弱 (不带日志),所以它的损坏有两种情况:
- ESP 分区里面的文件损坏
- GPT 分区表中的 ESP 分区信息损坏
但由于分区表损坏属于 GPT 损坏,所以第二种情况单拎出来写成一节。
mv /boot/efi/EFI /boot/efi/EFI.bak
此时 EFI 分区中的信息丢失,系统无法启动。
找一个 Linux LiveCD 开始修复。进入 LiveCD 环境后,执行 fdisk -l /dev/<bootable-disk> 会发现硬盘上的分区表还在。
先把硬盘上的 ESP 和根文件系统挂载到 LiveCD 的 /mnt 目录下:
# for ext series file system
mount /dev/<disk-partition> /mnt
mount /dev/<ESP-partition> /mnt/boot/efi

# for btrfs file system
mount /dev/<disk-partition> /mnt -o subvolid=<root-subvol-id>
mount /dev/<EFI-partition> /mnt/boot/efi
挂载必要的文件系统到 /mnt 中:
mount --rbind /dev  /mnt/dev
mount --rbind /proc /mnt/proc
mount --rbind /sys  /mnt/sys
chroot 到旧的 root 分区下:
chroot /mnt bash
重新生成 bootloader 到 ESP (这个过程中会重新写入 ESP 需要的数据):
grub-install --efi-directory=/boot/efi
重启恢复正常。
2.2. GPT 损坏
使用 GPT 分区方式的硬盘以 LBA (Logical Block Address 逻辑块寻址) 来定义扇区,比如 LBA0 LBA1 等。
接下来结合 gpt 结构图来分别说明:
- LBA0 的损坏
- LBA1 的损坏
- LBA2 - LBA33 的损坏
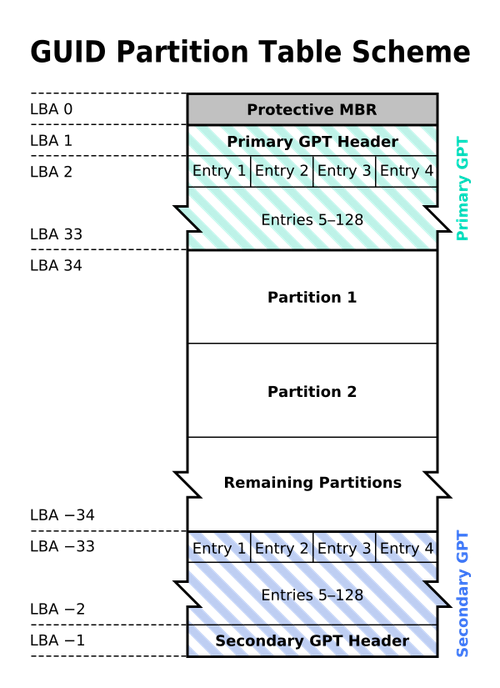
2.2.1. LBA0 损坏
LBA0 是 Protective MBR,它存在的目的是为了兼容旧的硬盘管理工具,以免工具不识别 GPT 格式而破坏硬盘中的数据。在支持从 GPT 启动的操作系统中,这里也用于存储第一阶段的启动代码。
在这个 MBR 中,只有一个标识为 0xEE 的分区,以此来表示这块硬盘使用 GPT 分区表。不能识别 GPT 硬盘的操作系统通常会识别出一个未知类型的分区,并且拒绝对硬盘进行操作,除非用户特别要求删除这个分区。这就避免了意外删除分区的危险。
另外,能够识别 GPT 分区表的操作系统会检查 Protective MBR 中的分区表,如果分区类型不是 0xEE 或者 MBR 分区表中有多个项,也会拒绝对硬盘进行操作。
$ fdisk -l

Disk /dev/sda: 16 GiB, 17179869184 bytes, 33554432 sectors
Disk model: VMware Virtual S
Units: sectors of 1 * 512 = 512 bytes
Sector size (logical/physical): 512 bytes / 512 bytes
I/O size (minimum/optimal): 512 bytes / 512 bytes
Disklabel type: gpt
Disk identifier: 9EA934A4-0FD5-4001-8ED1-35B1F0185C2E

Device       Start      End  Sectors  Size Type
/dev/sda1     2048  1050623  1048576  512M EFI System
/dev/sda2  1050624  3051519  2000896  977M Linux filesystem
/dev/sda3  3051520 33552383 30500864 14.5G Linux filesystem
先看 /dev/<bootable-device> 上 LBA0 (扇区 1,MBR) 中的内容:
# xxd -g 1 -l 512 /dev/<bootable-device>
00000000: 00 00 00 00 00 00 00 00 00 00 00 00 00 00 00 00  ................
00000010: 00 00 00 00 00 00 00 00 00 00 00 00 00 00 00 00  ................
00000020: 00 00 00 00 00 00 00 00 00 00 00 00 00 00 00 00  ................
00000030: 00 00 00 00 00 00 00 00 00 00 00 00 00 00 00 00  ................
00000040: 00 00 00 00 00 00 00 00 00 00 00 00 00 00 00 00  ................
00000050: 00 00 00 00 00 00 00 00 00 00 00 00 00 00 00 00  ................
00000060: 00 00 00 00 00 00 00 00 00 00 00 00 00 00 00 00  ................
00000070: 00 00 00 00 00 00 00 00 00 00 00 00 00 00 00 00  ................
00000080: 00 00 00 00 00 00 00 00 00 00 00 00 00 00 00 00  ................
00000090: 00 00 00 00 00 00 00 00 00 00 00 00 00 00 00 00  ................
000000a0: 00 00 00 00 00 00 00 00 00 00 00 00 00 00 00 00  ................
000000b0: 00 00 00 00 00 00 00 00 00 00 00 00 00 00 00 00  ................
000000c0: 00 00 00 00 00 00 00 00 00 00 00 00 00 00 00 00  ................
000000d0: 00 00 00 00 00 00 00 00 00 00 00 00 00 00 00 00  ................
000000e0: 00 00 00 00 00 00 00 00 00 00 00 00 00 00 00 00  ................
000000f0: 00 00 00 00 00 00 00 00 00 00 00 00 00 00 00 00  ................
00000100: 00 00 00 00 00 00 00 00 00 00 00 00 00 00 00 00  ................
00000110: 00 00 00 00 00 00 00 00 00 00 00 00 00 00 00 00  ................
00000120: 00 00 00 00 00 00 00 00 00 00 00 00 00 00 00 00  ................
00000130: 00 00 00 00 00 00 00 00 00 00 00 00 00 00 00 00  ................
00000140: 00 00 00 00 00 00 00 00 00 00 00 00 00 00 00 00  ................
00000150: 00 00 00 00 00 00 00 00 00 00 00 00 00 00 00 00  ................
00000160: 00 00 00 00 00 00 00 00 00 00 00 00 00 00 00 00  ................
00000170: 00 00 00 00 00 00 00 00 00 00 00 00 00 00 00 00  ................
00000180: 00 00 00 00 00 00 00 00 00 00 00 00 00 00 00 00  ................
00000190: 00 00 00 00 00 00 00 00 00 00 00 00 00 00 00 00  ................
000001a0: 00 00 00 00 00 00 00 00 00 00 00 00 00 00 00 00  ................
000001b0: 00 00 00 00 00 00 00 00 00 00 00 00 00 00 00 00  ................
000001c0: 02 00 ee ff ff ff 01 00 00 00 ff ff ff 01 00 00  ................
000001d0: 00 00 00 00 00 00 00 00 00 00 00 00 00 00 00 00  ................
000001e0: 00 00 00 00 00 00 00 00 00 00 00 00 00 00 00 00  ................
000001f0: 00 00 00 00 00 00 00 00 00 00 00 00 00 00 55 aa  ..............U.
对照 MBR 结构表:
| 地址 | 描述 | 大小(字节) |
|---|---|---|
| 0x0000 (0) | bootstrap code area | 446 |
| 0x01BE (446) | 1st partition entry | 16 |
| 0x01CE (462) | 2nd partition entry | 16 |
| 0x01DE (478) | 3rd partition entry | 16 |
| 0x01EE (494) | 4th partition entry | 16 |
| 0x01FE (510) | 0x55 (boot signature) | 1 |
| 0x01FF (511) | 0xAA (boot signature) | 1 |
可以看到,MBR 中的 bootstrap code 全为 0 (前 446 字节),分区表中也只有分区表 1 有数据:
00 00 02 00 ee ff ff ff 01 00 00 00 ff ff ff 01
对照分区表的内容:
| Offset | Size | Description |
|---|---|---|
| 0 | 1 byte | Boot indicator bit flag: 0 = no, 0x80 = bootable (or "active") |
| 1 | 1 byte | Starting head |
| 2 | 6 bits | Starting sector (Bits 6-7 are the upper two bits for the Starting Cylinder field.) |
| 3 | 10 bits | Starting Cylinder |
| 4 | 1 byte | System ID |
| 5 | 1 byte | Ending Head |
| 6 | 6 bits | Ending Sector (Bits 6-7 are the upper two bits for the ending cylinder field) |
| 7 | 10 bits | Ending Cylinder |
| 8 | 4 bytes (uint32_t) | Relative Sector (to start of partition -- also equals the partition's starting LBA value) |
| 12 | 4 bytes (uint32_t) | Total Sectors in partition |
其含义为:
00: 分区的激活状态 (80 表示分区被激活)00: 起始 Head02 00: 起始 Sector 和 Cylinderee: 分区类型 (System ID)ff: 结束 Headff ff: 结束 Sector 和 Cylinder01 00 00 00: 起始扇区的 LBAff ff ff 01: 此分区的扇区数
第 9 条: 由于 intel CPU 采用的是 little endian ,所以在小于 2T 的磁盘上,分区总的字节数应该是 Hex 01ffffff = Decimal 33554431 * 512,在大于 2T 的磁盘上,这个数始终算出来是 2T。
第 8 条: 同样地,根据 little endian 的表示方法,起始扇区应该是 Hex 00000001。
第 4 条: ee 的分区类型的作用是,告诉其他 MBR 磁盘工具这个磁盘是使用的 GPT 分区表,不让其他 MBR 磁盘工具将该磁盘识别为未分区的磁盘,并拒绝这些工具对磁盘的写操作,从而避免搞乱数据的风险。
现在通过几种不同的方式来模拟 LAB 0 中 MBR 分区表信息损坏的场景,看看会发生什么:
dd < /dev/zero >/dev/<bootable-disk> bs=1 count=446dd < /dev/zero >/dev/<bootable-disk> bs=1 count=450dd < /dev/zero >/dev/<bootable-disk> bs=1 count=451
限于篇幅,给出结果:
- 正常启动
- 正常启动
- 无法启动,但系统可以读到一个空的分区表
# 取出第 451 字节位置上的数据
$ xxd -g 1 -l 1 -s 450 /dev/<bootable-disk>
00001c2: ee

# 清除前 451 个字节的数据
$ dd < /dev/zero >/dev/<bootable-disk> bs=1 count=451

# 确认第 451 字节位置上的数据
$ xxd -g 1 -l 1 -s 450 /dev/<bootable-disk>
00001c2: 00
这也间接证明了第 451 字节所存储的 分区表类型 (0xee) 的作用,清除这个字节后,系统不能识别到这个磁盘使用了 GPT 分区表,从而找不到有效分区,系统就无法启动。但此时系统还能认到一个分区,因为 LBA0 里面本身就包含了一个分区表条目。清除前面的 450 个字节没有任何影响。
要修复这个问题,需要进入 LiveCD 后使用十六进制编辑工具 hexedit 手工编辑启动盘上 0x1C2 位置的数据为 ee ,使系统识别到这个磁盘是 GPT 格式的分区表之后就可以正常启动系统了。
但如果清空了 LBA0 的全部 512 个字节,则还需修改 LBA 的起始信息,也就是将第 455, 456, 457 字节修改为 01 00 00 ,其余信息则无所谓。
2.2.2. LBA1 损坏
LBA1 保存了 GPT 头数据,格式如下:
| Offset | Length | Contents |
|---|---|---|
| 00(0x00) | 8 bytes | Signature ("EFI PART", 45h 46h 49h 20h 50h 41h 52h 54h or 0x5452415020494645ULL on little-endian machines) |
| 08(0x08) | 4 bytes | Revision 1.0 (00h 00h 01h 00h) for UEFI 2.8 |
| 12(0x0C) | 4 bytes | Header size in little endian (in bytes, usually 5Ch 00h 00h 00h or 92 bytes) |
| 16(0x10) | 4 bytes | CRC32 of header (offset +0 to +0x5b) in little endian, with this field zeroed during calculation |
| 20(0x14) | 4 bytes | Reserved; must be zero |
| 24(0x18) | 8 bytes | Current LBA (location of this header copy) |
| 32(0x20) | 8 bytes | Backup LBA (location of the other header copy) |
| 40(0x28) | 8 bytes | First usable LBA for partitions (primary partition table last LBA + 1) |
| 48(0x30) | 8 bytes | Last usable LBA (secondary partition table first LBA − 1) |
| 56(0x38) | 16 bytes | Disk GUID in mixed endian |
| 72(0x48) | 8 bytes | Starting LBA of array of partition entries (usually 2 for compatibility) |
| 80(0x50) | 4 bytes | Number of partition entries in array |
| 84(0x54) | 4 bytes | Size of a single partition entry (usually 80h or 128) |
| 88(0x58) | 4 bytes | CRC32 of partition entries array in little endian |
| 92(0x5C) | * | Reserved; must be zeros for the rest of the block (420 bytes for a sector size of 512 bytes; but can be more with larger sector sizes) |
读取 LBA1 的 512 个字节:
$ xxd -g 1 -l 512 -s 512 /dev/<bootable-disk>
00000200: 45 46 49 20 50 41 52 54 00 00 01 00 5c 00 00 00  EFI PART....\...
00000210: 42 e5 f8 d2 00 00 00 00 01 00 00 00 00 00 00 00  B...............
00000220: ff ff bf 03 00 00 00 00 00 08 00 00 00 00 00 00  ................
00000230: de ff bf 03 00 00 00 00 89 47 0d 1d 7e 1f 4c 94  .........G..~.L.
00000240: 9d aa 0d 1a 4b 88 e2 c8 02 00 00 00 00 00 00 00  ....K...........
00000250: 80 00 00 00 80 00 00 00 34 3e 70 1b 00 00 00 00  ........4>p.....
00000260: 00 00 00 00 00 00 00 00 00 00 00 00 00 00 00 00  ................
00000270: 00 00 00 00 00 00 00 00 00 00 00 00 00 00 00 00  ................
00000280: 00 00 00 00 00 00 00 00 00 00 00 00 00 00 00 00  ................
00000290: 00 00 00 00 00 00 00 00 00 00 00 00 00 00 00 00  ................
000002a0: 00 00 00 00 00 00 00 00 00 00 00 00 00 00 00 00  ................
000002b0: 00 00 00 00 00 00 00 00 00 00 00 00 00 00 00 00  ................
000002c0: 00 00 00 00 00 00 00 00 00 00 00 00 00 00 00 00  ................
000002d0: 00 00 00 00 00 00 00 00 00 00 00 00 00 00 00 00  ................
000002e0: 00 00 00 00 00 00 00 00 00 00 00 00 00 00 00 00  ................
000002f0: 00 00 00 00 00 00 00 00 00 00 00 00 00 00 00 00  ................
00000300: 00 00 00 00 00 00 00 00 00 00 00 00 00 00 00 00  ................
00000310: 00 00 00 00 00 00 00 00 00 00 00 00 00 00 00 00  ................
00000320: 00 00 00 00 00 00 00 00 00 00 00 00 00 00 00 00  ................
00000330: 00 00 00 00 00 00 00 00 00 00 00 00 00 00 00 00  ................
00000340: 00 00 00 00 00 00 00 00 00 00 00 00 00 00 00 00  ................
00000350: 00 00 00 00 00 00 00 00 00 00 00 00 00 00 00 00  ................
00000360: 00 00 00 00 00 00 00 00 00 00 00 00 00 00 00 00  ................
00000370: 00 00 00 00 00 00 00 00 00 00 00 00 00 00 00 00  ................
00000380: 00 00 00 00 00 00 00 00 00 00 00 00 00 00 00 00  ................
00000390: 00 00 00 00 00 00 00 00 00 00 00 00 00 00 00 00  ................
000003a0: 00 00 00 00 00 00 00 00 00 00 00 00 00 00 00 00  ................
000003b0: 00 00 00 00 00 00 00 00 00 00 00 00 00 00 00 00  ................
000003c0: 00 00 00 00 00 00 00 00 00 00 00 00 00 00 00 00  ................
000003d0: 00 00 00 00 00 00 00 00 00 00 00 00 00 00 00 00  ................
000003e0: 00 00 00 00 00 00 00 00 00 00 00 00 00 00 00 00  ................
000003f0: 00 00 00 00 00 00 00 00 00 00 00 00 00 00 00 00  ................
可以看出 GPT 头中主要包含了磁盘的一些定义内容。这里的内容很多,就不一一对应列出了。
需要注意,如果清除掉 LBA1:
dd < /dev/zero >/dev/<bootable-disk> seek=512 bs=1 count=512
系统完全可以正常启动。并且 LBA1 又会恢复成初始的值。
其原因是,GPT 头信息被备份在了最后一个扇区中 (在 GPT 头结构表中提过),所以即使清空掉 LBA1,系统也不受影响,系统会自动根据最后一个 LBA 中的数据恢复 LBA1。但如果把 LBA1 和最后一个 LBA 也清空,那系统就无法启动了 (其实只要清空 LBA1 和最后一个 LBA 的前 8 个字节系统就无法启动了)。
查看最后一个 LBA 的数据:
$ xxd -g 1 -l 512 -s $((`blockdev --getsz /dev/<bootable-disk>` * 512 - 512)) /dev/<bootable-disk>
# 这里会显示和 LBA1 一样的数据,篇幅受限,不放内容了
执行下面的命令前一定要先 备份数据。删除 LBA1 和最后一个 LBA 的数据:
# 以下两条命令仅推荐在虚拟机里测试
$ dd < /dev/zero >/dev/<bootable-disk> seek=512 bs=1 count=8
$ dd < /dev/zero >/dev/<bootable-disk> count=512 bs=1 seek=$((`blockdev --getsz /dev/<bootable-disk>` * 512 - 512))
2.2.3. LBA2 - LBA33 损坏
LBA2 - LBA33 用来存储分区表数据,这 31 个 LBA 里包含了所有的分区表信息。
GPT 分区表的结构是:
| Offset | Length | Contents |
|---|---|---|
| 00 (0x00) | 16 bytes | Partition type GUID (mixed endian) |
| 16 (0x10) | 16 bytes | Unique partition GUID (mixed endian) |
| 32 (0x20) | 8 bytes | First LBA (little endian) |
| 40 (0x28) | 8 bytes | Last LBA (inclusive, usually odd) |
| 48 (0x30) | 8 bytes | Attribute flags (e.g. bit 60 denotes read-only) |
| 56 (0x38) | 72 bytes | Partition name (36 UTF-16LE code units) |
但由于 GPT 规范里并没有规定一个分区条目要占用多少个 LBA,所以要找指定分区的信息不太方便。下面给个例子看看这些分区里的数据。由于后面全是 0,所以只截取前 176 字节的数据:
$ xxd -g 1 -l 176 -s 1024 /dev/<bootable-disk>
00000400: 28 73 2a c1 1f f8 d2 11 ba 4b 00 a0 c9 3e c9 3b  (s*......K...>.;
00000410: 9e d8 e6 d4 ae dc 43 2e bf f6 aa ae 66 77 0e 0d  ......C.....fw..
00000420: 00 08 00 00 00 00 00 00 ff 07 40 00 00 00 00 00  ..........@.....
00000430: 00 00 00 00 00 00 00 00 00 00 00 00 00 00 00 00  ................
00000440: 00 00 00 00 00 00 00 00 00 00 00 00 00 00 00 00  ................
00000450: 00 00 00 00 00 00 00 00 00 00 00 00 00 00 00 00  ................
00000460: 00 00 00 00 00 00 00 00 00 00 00 00 00 00 00 00  ................
00000470: 00 00 00 00 00 00 00 00 00 00 00 00 00 00 00 00  ................
00000480: af 3d c6 0f 83 84 72 47 8e 79 3d 69 d8 47 7d e4  .=....rG.y=i.G}.
00000490: a6 0b 8c f5 3d 23 41 df ac 81 95 0d d6 d8 c9 3c  ....=#A........<
000004a0: 00 08 40 00 00 00 00 00 ff f7 bf 03 00 00 00 00  ..@.............
再结合系统上的分区信息:
# 硬盘上有两个分区所以是 /dev/<bootable-disk>[1-2]
# 展开的写法是 /dev/<bootable-disk-1st-partition> /dev/<bootable-disk-2nd-partition>
$ blkid -o export -p /dev/<bootable-disk>[1-2]
DEVNAME=/dev/sda1
UUID=DEDD-195B
VERSION=FAT32
BLOCK_SIZE=512
TYPE=vfat
USAGE=filesystem
PART_ENTRY_SCHEME=gpt
PART_ENTRY_UUID=d4e6d89e-dcae-2e43-bff6-aaae66770e0d
PART_ENTRY_TYPE=c12a7328-f81f-11d2-ba4b-00a0c93ec93b
PART_ENTRY_NUMBER=1
PART_ENTRY_OFFSET=2048
PART_ENTRY_SIZE=4194304
PART_ENTRY_DISK=8:0

DEVNAME=/dev/sda2
UUID=abc1086a-ccf1-4586-bc66-413602614f84
UUID_SUB=b49467de-bd65-469d-9d90-be5febd1c25d
BLOCK_SIZE=4096
TYPE=btrfs
USAGE=filesystem
PART_ENTRY_SCHEME=gpt
PART_ENTRY_UUID=f58c0ba6-233d-df41-ac81-950dd6d8c93c
PART_ENTRY_TYPE=0fc63daf-8483-4772-8e79-3d69d8477de4
PART_ENTRY_NUMBER=2
PART_ENTRY_OFFSET=4196352
PART_ENTRY_SIZE=58716160
PART_ENTRY_DISK=8:0
LBA-1 - LBA-33 上的数据是 LBA1 - LBA33 中数据的备份,剩下 LBA34 ~ LBA-34 是每个分区真正保存数据的位置。
LBA2 - LBA33 同 LBA1 一样,如果同时清掉 LBA2 - LBA33 和 LBA-2 - LBA-33 的数据,系统由于找不到分区表,从而无法启动。
2.3. 总结
| 故障 | 修复 |
|---|---|
| LBA0 损坏 | 手动修改 LAB0 的第 451, 455, 456, 457 字节处的数据 |
| LBA1 损坏 | 从 LBA-1 (即备份) 恢复数据 |
| LBA2 - LBA33 损坏 | 从 LBA-2 ~ LBA-33 (即备份) 恢复数据 |
| LBA1 - LBA33 和 LBA-1 - LBA-33 损坏 | 根据平时的备份数据,手工修改对应 LBA 中的字节 |
不能手动修复时,可以试着用其他工具来自动恢复,比如 gpart gdisk sgdisk 等。
3. MBR 混杂格式 (Hybrid MBR)
注意: 这不是标准格式,尽量不要使用。
它出现的目的是让不识别 GPT 格式的程序把硬盘识别为 MBR 格式。使用 gdisk, gptsync 可以制作 Hybrid MBR。
如同前文所说的,为了保证兼容性,GPT 硬盘的第一个扇区是 Protective MBR。因此,GPT 格式硬盘的第一扇区上也会有一个 MBR 分区表,该表包含一个跨越整个硬盘的保护性分区 (分区范围是从 0 计数的 1 扇区到最后一个扇区),并且分区表内 system id 这个字段的值为 ee (表示这个硬盘使用 GPT 格式)。这保证了旧的硬盘管理软件不会将硬盘误认为空盘,并且如果硬盘管理软件支持 GPT 格式的硬盘,那么 system id 字段的值 ee 也可以让软件识别到这个硬盘使用了 GPT 格式。
这意味着,Protective MBR 中的分区表还有三个位置可以用,也就还可以创建三个分区。这样一来,不支持 GPT 的软件仍然能够看到一个不认识的 ee 分区和三个正常的分区。
但是,使用 Hybrid MBR 格式完全是自找麻烦,因为这不是标准用法:
- 几乎每家对 Hybrid MBR 的兼容都不一样
- Linux 只认 Hybrid 中的 GPT
- Windows 如果发现 Hybrid MBR 就只认其中的 MBR
- 似乎 Linux 如果看到 Protective MBR 的保护性分区不以 Sector 1 开始,就会抹掉 Protective MBR 后再重建。这个保护性的分区可以不是分区表的第一项
- 硬盘内有 MBR 和 GPT 两套分区表,这意味着用户可以在 MBR 和 GPT 分区表中指定完全不同的分区位置,分区位置甚至可以交错。当然,这么干的后果就是丢数据
- Hybrid MBR 已经是非标准了,Hybrid MBR 里面再玩扩展分区则是非标准中的非标准。正经的分区软件根本不让在 Hybrid MBR 中创建扩展分区,甚至,不提供将硬盘格式化成 Hybrid MBR 这个功能
这种混杂格式一般在配置多系统启动的时候才会用得到。特别是一块硬盘上包含了早期不支持 GPT 格式硬盘的 Windows 系统和其他支持 GPT 格式硬盘的系统。
这里以 gdisk 工具制作出的 Hybrid MBR 为例,探索一下 Hybrid MBR 中 Protective MBR 中的内容。
在虚拟机中使用 GPT 安装一个新的 Linux 系统,安装完成后建立快照方便回滚,然后进入系统查看 Protective MBR 中的内容:
$ fdisk -l /dev/sda
Disk /dev/sda: 16 GiB, 17179869184 bytes, 33554432 sectors
Disk model: VMware Virtual S
Units: sectors of 1 * 512 = 512 bytes
Sector size (logical/physical): 512 bytes / 512 bytes
I/O size (minimum/optimal): 512 bytes / 512 bytes
Disklabel type: gpt
Disk identifier: 9EA934A4-0FD5-4001-8ED1-35B1F0185C2E

Device       Start      End  Sectors  Size Type
/dev/sda1     2048  1050623  1048576  512M EFI System       # 挂载点 /boot/efi
/dev/sda2  1050624  3051519  2000896  977M Linux filesystem # 挂载点 /boot
/dev/sda3  3051520 33552383 30500864 14.5G Linux filesystem # 挂载点 /

$ xxd -g 1 -l 512 /dev/sda
00000000: 00 00 00 00 00 00 00 00 00 00 00 00 00 00 00 00  ................
00000010: 00 00 00 00 00 00 00 00 00 00 00 00 00 00 00 00  ................
00000020: 00 00 00 00 00 00 00 00 00 00 00 00 00 00 00 00  ................
00000030: 00 00 00 00 00 00 00 00 00 00 00 00 00 00 00 00  ................
00000040: 00 00 00 00 00 00 00 00 00 00 00 00 00 00 00 00  ................
00000050: 00 00 00 00 00 00 00 00 00 00 00 00 00 00 00 00  ................
00000060: 00 00 00 00 00 00 00 00 00 00 00 00 00 00 00 00  ................
00000070: 00 00 00 00 00 00 00 00 00 00 00 00 00 00 00 00  ................
00000080: 00 00 00 00 00 00 00 00 00 00 00 00 00 00 00 00  ................
00000090: 00 00 00 00 00 00 00 00 00 00 00 00 00 00 00 00  ................
000000a0: 00 00 00 00 00 00 00 00 00 00 00 00 00 00 00 00  ................
000000b0: 00 00 00 00 00 00 00 00 00 00 00 00 00 00 00 00  ................
000000c0: 00 00 00 00 00 00 00 00 00 00 00 00 00 00 00 00  ................
000000d0: 00 00 00 00 00 00 00 00 00 00 00 00 00 00 00 00  ................
000000e0: 00 00 00 00 00 00 00 00 00 00 00 00 00 00 00 00  ................
000000f0: 00 00 00 00 00 00 00 00 00 00 00 00 00 00 00 00  ................
00000100: 00 00 00 00 00 00 00 00 00 00 00 00 00 00 00 00  ................
00000110: 00 00 00 00 00 00 00 00 00 00 00 00 00 00 00 00  ................
00000120: 00 00 00 00 00 00 00 00 00 00 00 00 00 00 00 00  ................
00000130: 00 00 00 00 00 00 00 00 00 00 00 00 00 00 00 00  ................
00000140: 00 00 00 00 00 00 00 00 00 00 00 00 00 00 00 00  ................
00000150: 00 00 00 00 00 00 00 00 00 00 00 00 00 00 00 00  ................
00000160: 00 00 00 00 00 00 00 00 00 00 00 00 00 00 00 00  ................
00000170: 00 00 00 00 00 00 00 00 00 00 00 00 00 00 00 00  ................
00000180: 00 00 00 00 00 00 00 00 00 00 00 00 00 00 00 00  ................
00000190: 00 00 00 00 00 00 00 00 00 00 00 00 00 00 00 00  ................
000001a0: 00 00 00 00 00 00 00 00 00 00 00 00 00 00 00 00  ................
000001b0: 00 00 00 00 00 00 00 00 00 00 00 00 00 00 00 00  ................
000001c0: 02 00 ee ff ff ff 01 00 00 00 ff ff ff 01 00 00  ................
000001d0: 00 00 00 00 00 00 00 00 00 00 00 00 00 00 00 00  ................
000001e0: 00 00 00 00 00 00 00 00 00 00 00 00 00 00 00 00  ................
000001f0: 00 00 00 00 00 00 00 00 00 00 00 00 00 00 55 aa  ..............U.
安装 gdisk,开始制作 Hybrid MBR 硬盘:
# 需要注意,第 2 个分区是的挂载点是 /boot 目录,所以给这个分区添加 bootable flag
# 如果除了 ESP 之外只有一个分区挂载到根目录,那么这个分区要有 bootable flag
$ gdisk /dev/sda
GPT fdisk (gdisk) version 1.0.6

Partition table scan:
  MBR: protective
  BSD: not present
  APM: not present
  GPT: present

Found valid GPT with protective MBR; using GPT.

Command (? for help): r

Recovery/transformation command (? for help): h

WARNING! Hybrid MBRs are flaky and dangerous! If you decide not to use one,
just hit the Enter key at the below prompt and your MBR partition table will
be untouched.

Type from one to three GPT partition numbers, separated by spaces, to be
added to the hybrid MBR, in sequence: 1 2 3
Place EFI GPT (0xEE) partition first in MBR (good for GRUB)? (Y/N): y

Creating entry for GPT partition #1 (MBR partition #2)
Enter an MBR hex code (default EF):
Set the bootable flag? (Y/N): n

Creating entry for GPT partition #2 (MBR partition #3)
Enter an MBR hex code (default 83):
Set the bootable flag? (Y/N): y

Creating entry for GPT partition #3 (MBR partition #4)
Enter an MBR hex code (default 83):
Set the bootable flag? (Y/N): n

Recovery/transformation command (? for help): w

Final checks complete. About to write GPT data. THIS WILL OVERWRITE EXISTING
PARTITIONS!!

Do you want to proceed? (Y/N): y
OK; writing new GUID partition table (GPT) to /dev/sda.
Warning: The kernel is still using the old partition table.
The new table will be used at the next reboot or after you
run partprobe(8) or kpartx(8)
The operation has completed successfully.
查看 Hybrid MBR 中的 Protective MBR 存储的信息:
$ xxd -g 1 -l 512 /dev/sda
00000000: 00 00 00 00 00 00 00 00 00 00 00 00 00 00 00 00  ................
00000010: 00 00 00 00 00 00 00 00 00 00 00 00 00 00 00 00  ................
00000020: 00 00 00 00 00 00 00 00 00 00 00 00 00 00 00 00  ................
00000030: 00 00 00 00 00 00 00 00 00 00 00 00 00 00 00 00  ................
00000040: 00 00 00 00 00 00 00 00 00 00 00 00 00 00 00 00  ................
00000050: 00 00 00 00 00 00 00 00 00 00 00 00 00 00 00 00  ................
00000060: 00 00 00 00 00 00 00 00 00 00 00 00 00 00 00 00  ................
00000070: 00 00 00 00 00 00 00 00 00 00 00 00 00 00 00 00  ................
00000080: 00 00 00 00 00 00 00 00 00 00 00 00 00 00 00 00  ................
00000090: 00 00 00 00 00 00 00 00 00 00 00 00 00 00 00 00  ................
000000a0: 00 00 00 00 00 00 00 00 00 00 00 00 00 00 00 00  ................
000000b0: 00 00 00 00 00 00 00 00 00 00 00 00 00 00 00 00  ................
000000c0: 00 00 00 00 00 00 00 00 00 00 00 00 00 00 00 00  ................
000000d0: 00 00 00 00 00 00 00 00 00 00 00 00 00 00 00 00  ................
000000e0: 00 00 00 00 00 00 00 00 00 00 00 00 00 00 00 00  ................
000000f0: 00 00 00 00 00 00 00 00 00 00 00 00 00 00 00 00  ................
00000100: 00 00 00 00 00 00 00 00 00 00 00 00 00 00 00 00  ................
00000110: 00 00 00 00 00 00 00 00 00 00 00 00 00 00 00 00  ................
00000120: 00 00 00 00 00 00 00 00 00 00 00 00 00 00 00 00  ................
00000130: 00 00 00 00 00 00 00 00 00 00 00 00 00 00 00 00  ................
00000140: 00 00 00 00 00 00 00 00 00 00 00 00 00 00 00 00  ................
00000150: 00 00 00 00 00 00 00 00 00 00 00 00 00 00 00 00  ................
00000160: 00 00 00 00 00 00 00 00 00 00 00 00 00 00 00 00  ................
00000170: 00 00 00 00 00 00 00 00 00 00 00 00 00 00 00 00  ................
00000180: 00 00 00 00 00 00 00 00 00 00 00 00 00 00 00 00  ................
00000190: 00 00 00 00 00 00 00 00 00 00 00 00 00 00 00 00  ................
000001a0: 00 00 00 00 00 00 00 00 00 00 00 00 00 00 00 00  ................
000001b0: 00 00 00 00 00 00 00 00 00 00 00 00 00 00 00 00  ................
000001c0: 02 00 ee 20 20 00 01 00 00 00 ff 07 00 00 00 20  ...  ..........
000001d0: 21 00 ef 65 24 41 00 08 00 00 00 00 10 00 80 65  !..e$A.........e
000001e0: 25 41 83 f1 34 bd 00 08 10 00 00 88 1e 00 00 f1  %A..4...........
000001f0: 35 bd 83 fe ff ff 00 90 2e 00 00 68 d1 01 55 aa  5..........h..U.
可以看到 Hybrid MBR 硬盘上 MBR 分区表内第一个分区的结束地址不再是最后一个扇区,而是第一个分区实际上的结束地址。
在这个例子的 Protective MBR 中:
- 分区表内第一个分区的范围是 1 (
00 00 00 01) 扇区开始,往后数 2047 (00 00 07 FF) 个扇区 - 分区表内第二个分区是 GPT 分区表中的第一个分区,即 2048 (
00 00 08 00) 扇区开始,往后数 1048576 (00 10 00 00) 个扇区 - 分区表内第三个分区是 GPT 分区表中的第二个分区,即 1050624 (
00 10 08 00) 扇区开始,往后数 2000896 (00 1E 88 00) 个扇区 - 分区表内第四个分区是 GPT 分区表中的第三个分区,即 3051520 (
00 2E 90 00) 扇区开始,往后数 30500864 (01 D1 68 00) 个扇区
因为 MBR 格式需要在第一扇区之后预留 1MB 左右的空间给 core.img 使用,所以多数分区工具默认从 2048 扇区开始创建分区,即使在使用 UEFI+GPT 后,这段空间不再必需,这个习惯依旧被保留了下来。gdisk 为了不让一些硬盘管理软件识别到这个 MBR-gap 是未被分区使用的空间,就自作主张地将保护性分区的结束位置改成了 2047,也就有了 Protective MBR 分区表中的第一个分区。
以上就是 gdisk 制作出的 Hybrid MBR 格式硬盘的基本结构。
其他软件制作出的 Hybrid MBR 格式硬盘可能不同。比如,有的制作 Hybrid MBR 的软件可能不会生成上面例子中的第一个分区 (System ID 为 EE ,范围为扇区 1 到扇区 2047 的分区)。这可能导致不支持 GPT 只支持 MBR 的软件将未定义的硬盘空间误认为是未使用的空间,而这部分未被 Protective MBR 分区表记录的空间有可能被用来存储与 GPT 格式相关的数据 (通常是 LBA1 到 LBA33 和 LBA-1 到 LBA-33,即扇区 1 到扇区 33 和扇区 -1 到扇区 -33)。
除此之外 Hybrid MBR 要想更改分区也极为困难,因为这个操作涉及与 GPT 分区表同步数据。虽然用户可以自行阅读二进制的 GPT 分区表并将二进制的分区数据手动同步到 Protective MBR 中,但是应该不会有人这么操作吧。
如果系统有两个物理硬盘可用,最好的解决方案是让一个硬盘使用 GPT 格式,另一个使用 MBR 格式。
最后, 尽量不要用 Hybrid MBR 格式 。
4. GPT 和 MBR 硬盘关键数据的备份
4.1. MBR 硬盘关键数据备份和恢复
MBR 扇区数据备份和回复:
# 备份 MBR
dd if=/dev/<bootable-disk> of=/backup/mbr.backup  bs=1  count=512
# 恢复 MBR
dd if=/backup/mbr.backup  of=/dev/<bootable-disk>
分区表备份和恢复:
# 备份分区表
dd if=/dev/<bootable-disk> of=/backup/partition_table.bak bs=1 count=64 skip=446
# 恢复分区表
dd if=/backup/partition_table.bak of=/dev/<bootable-disk> bs=1 seek=446
4.2. GPT 硬盘关键数据备份和恢复
# 备份 Protective MBR
dd if=/dev/<bootable-disk> of=gpt-mbr bs=512 count=1
# 恢复 Protective MBR
dd if=gpt-mbr of=/dev/<bootable-disk> bs=512 count=1


# 备份完整的 GPT 分区表
dd if=/dev/<bootable-disk> of=gpt-partition bs=512 count=34
# 恢复完整的 GPT 分区表
dd if=gpt--partition of=/dev/<bootable-disk> bs=512 count=34


# 仅备份 GPT 头和 GPT 分区
dd if=/dev/<bootable-disk> of=gpt-partition bs=512 skip=1 count=33
# 恢复单独的 GPT 分区信息
dd if=gpt-partition of=/dev/<bootable-disk> bs=512 skip=1 seek=1 count=33